Let’s face it, maintaining our vehicle’s brake system is critical to our safety and peace of mind. In “The Ultimate Guide to Brake Pad Replacement,” we dive into the nitty-gritty of everything we need to know about keeping our brakes in top shape. From understanding the telltale signs of worn-out pads to step-by-step instructions on how to replace them, this guide is here to help us navigate the process with confidence. Whether we’re seasoned DIYers or just looking to save a few bucks at the mechanic, this comprehensive article is the go-to resource for all our brake pad replacement needs.
Have you ever heard a screeching noise when coming to a stop and wondered if it’s time to replace your brake pads? It’s a situation we’ve all been in at some point, and it’s a clear signal that our braking system needs some attention. Brake pads are a critical component of our vehicles, providing the necessary friction to slow down or stop. Knowing how to replace them ourselves can save us money and ensure our safety on the road.
Understanding Brake Pads
Before we dive into the step-by-step guide for replacing brake pads, it’s essential to understand what they are and the role they play in our vehicle’s braking system. This helps us appreciate why timely maintenance is crucial.
What Are Brake Pads?
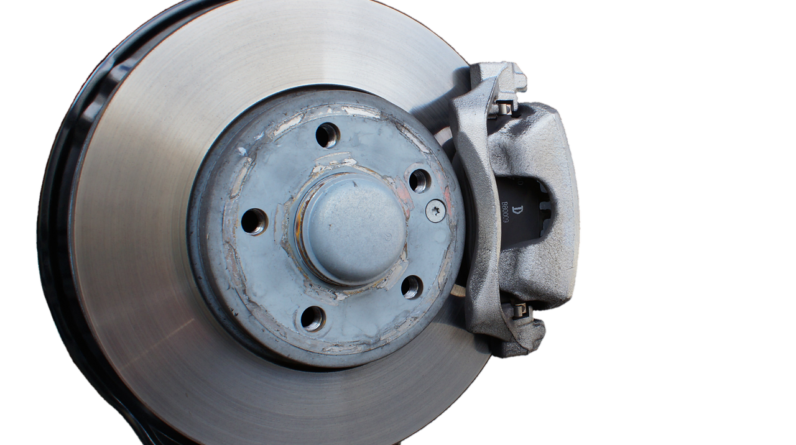
Brake pads are components of disc brakes used in automotive and other applications. They consist of steel backing plates with friction material bound to the surface that faces the disc brake rotor.
How Do Brake Pads Work?
When we press the brake pedal, the brake pads are squeezed against the brake disc (or rotor) creating friction. This friction slows the rotation of the wheel, causing our vehicle to slow down or come to a stop. Over time, this friction material wears down, making brake pad replacement necessary.
Types of Brake Pads
Brake pads come in different types, each with its own advantages and disadvantages. Here, we categorize the main types to help us make an informed choice.
| Type | Advantages | Disadvantages |
|---|---|---|
| Ceramic | Quiet, long-lasting, performance in a wide range of temperatures | More expensive |
| Semi-metallic | Good performance, durable | Noisier, wears down rotors quicker |
| Organic | Quiet, affordable | Wear out faster, less effective in high temperatures |
When to Replace Brake Pads
Knowing when to replace brake pads is crucial to maintaining our safety and vehicle performance. There are several indicators that it might be time to replace our brake pads.
Warning Signs
- Squealing or Screeching Noises: High-pitched noises when braking usually indicate that the brake pads have worn down and need replacing.
- Grinding Sound: This indicates that the brake pad material has worn away completely, and the metal backing plate is grinding against the rotor.
- Indicator Light: Many modern vehicles have a brake warning light on the dashboard that illuminates when the brake pads need attention.
- Visual Inspection: We can visually check the thickness of the brake pads through the wheel spokes. If the pad is less than 1/4 inch thick, it’s time for a replacement.
- Increased Stopping Distance: If our vehicle takes longer to come to a stop, this could be a sign that our brake pads are worn out.
- Vibration When Braking: This could indicate warped rotors or unevenly worn brake pads.

Tools and Materials Required
Having the right tools and materials ready before we start can make the brake pad replacement process smoother. Here’s a list of what we’ll need:
Basic Tools
- Jack and Jack Stands: To lift the vehicle safely.
- Lug Wrench: To remove the wheel nuts.
- C-Clamp: To compress the brake caliper piston.
- Socket Set: Various sizes needed to remove bolts.
- Brake Pad Spreader: Optional, but handy for pushing back the piston.
- Torque Wrench: For ensuring bolts are tightened to manufacturer’s specifications.
- Brake Grease: To lubricate the brake components.
- Bungee Cord or Rope: To hang the caliper off the suspension.
Materials
- New Brake Pads: Ensure they are the correct type and fit for your vehicle.
- Brake Cleaner: To clean the brake components.
- New Brake Hardware: Sometimes included with new brake pads.
- Anti-Seize Compound: To apply to the back of the brake pads if not already treated.
Step-by-Step Guide to Replacing Brake Pads
Now that we know why it’s important to replace our brake pads and we have our tools and materials ready, let’s get into the detailed steps for replacing them.
Step 1: Safety First
- Park on a Level Surface: Ensure the vehicle is parked on a flat surface.
- Engage the Parking Brake: To prevent the car from rolling.
- Use Wheel Chocks: Place wheel chocks behind the tires to secure the vehicle.
Step 2: Loosen the Lug Nuts
- Before jacking up the vehicle, use the lug wrench to slightly loosen the lug nuts on the tire that we will be working on. This makes it easier to remove the tire once it’s lifted.
Step 3: Lift the Vehicle
- Position the Jack: Place the jack under the vehicle at the recommended lifting point.
- Lift the Vehicle: Raise it until the tire is off the ground.
- Secure with Jack Stands: Place jack stands under the vehicle and lower it onto them for added safety.
Step 4: Remove the Tire
- Fully remove the loosened lug nuts and take the tire off the vehicle.
Step 5: Locate the Brake Caliper
- Identify the Caliper: The brake caliper is a clamping device along the rotor.
- Remove the Caliper Bolts: Use the socket set to unscrew the caliper mounting bolts.
Step 6: Remove the Brake Pads
- Swing the Caliper Away: Carefully swing the caliper away from the brake rotor. Use a bungee cord to hang it from the suspension if necessary.
- Remove the Old Pads: Slide the old brake pads out of the caliper bracket.
- Inspect the Components: Check the condition of the rotor and caliper. Replace if needed.
Step 7: Install New Brake Pads
- Apply Brake Grease: Apply brake grease to the contact points on the back of the new brake pads.
- Place New Pads: Slide the new pads into the caliper bracket.
- Compress the Caliper Piston: Use a C-clamp or brake pad spreader to push the caliper piston back into its bore to make room for the new pads.
Step 8: Reassemble the Brake Caliper
- Position the Caliper: Swing the caliper back over the rotor and new brake pads.
- Reattach Caliper Bolts: Insert and tighten the caliper mounting bolts. Use a torque wrench to ensure they are tightened to the manufacturer’s specifications.
Step 9: Reinstall the Tire
- Place the tire back onto the wheel hub and hand-tighten the lug nuts.
- Use the jack to lift the vehicle slightly, remove the jack stands, and lower the vehicle to the ground.
- Fully tighten the lug nuts in a star pattern with the lug wrench.
Step 10: Final Checks
- Press the Brake Pedal: Before starting the vehicle, press the brake pedal a few times to ensure the brake pads are seated correctly.
- Check Brake Fluid: Ensure the brake fluid level is correct.
- Test Drive: Carefully take the vehicle for a short test drive to ensure everything is functioning correctly.

Maintenance Tips
Regular maintenance can prolong the life of our brake pads and ensure our vehicle’s braking system stays in top condition.
Regularly Check Brake Fluid
Always ensure the brake fluid is at the right level and free from contaminants. Low brake fluid can be a sign of worn brake pads or a leak in the system.
Inspect Brake Pads and Rotors
Regularly inspect the brake pads and rotors for wear. Catching issues early can prevent more extensive and expensive repairs later.
Clean Brake Components
Keeping the brake components clean from dust and dirt can impact their performance and lifespan. Use brake cleaner during routine inspections and maintenance.
Avoid Hard Braking
Try to avoid sudden and hard braking whenever possible. Gradual slowing down can help preserve the brake pads and reduce unnecessary wear.
Use Quality Parts
Using high-quality brake pads and components can make a significant difference in performance and durability. It might be tempting to go for the cheapest option, but investing in quality parts can save us money in the long run.
Conclusion
Replacing brake pads is a task that, with a bit of knowledge and the right tools, we can do ourselves. It not only saves us money but also gives us a better understanding of our vehicle’s braking system. Regular inspections and maintenance can keep our brakes in optimal condition, ensuring our safety on the road. So, the next time we hear that telltale screech, we’ll know just what to do!
Remember, safety first: if at any point we feel unsure or uncomfortable with the process, seeking professional help is the best course of action. Happy driving, and stay safe!


